Tuesday, April 16, 2013

Snow With Sprinkles- By Colleen Reynolds

The kids spent most of the morning making crafts and coloring, but
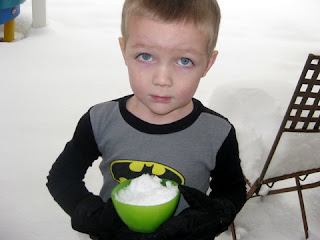
come mid-morning they were ready for a snack: snow with sprinkles!
Simply scoop some clean snow into a bowl and top with sprinkles.  The
kids think it is a real treat!  We got this idea from Judy Haywood and
now every time is snows we have to get out the sprinkles.   Hope you
have a great day!


Bring the Snow Inside!- By Melinda Crenshaw

For little ones not quite ready to go out in the snow (or moms not up for it), bring the snow inside! Bring a bowl full of snow in the kitchen and let the kids play with bowls, spoons, measuring cups dipping snow.

Two Soups, To Warm You From the Inside Out!- By Sarah Longoria

Sausage, Chickpea, and Potato Soup
*My kids and husband devour this, always wanting seconds and thirds!
  • 1 cup dried chickpeas (I use a 14oz can of chickpeas, sometimes two, depends on how much you like chickpeas)
  • Salt
  • ½ pound fresh Italian Sausage (I use a pound, usually hot)
  • 1 tablespoon fresh rosemary leaves, minced
  • 3 garlic cloves
  • 4 tablespoons olive oil
  • 1 small onion, peeled and sliced (½ cup)
  • ¼ teaspoon red pepper flakes
  • 14 ounce can crushed Italian Plum tomatoes (I use a 28 ounce can, and sometimes throw in another 14 oz can of diced tomatoes)
  • ¾ pound russet potatoes, peeled and cut into ½ inch cubes
  • 6 cups chicken broth (I usually use one box, about 4 cups, of Swanson's broth)
  • Toasts of Tuscan bread, rubbed with garlic
If you are using dried chickpeas, bring water to a boil in a 4-quart pot and pour it over the chickpeas and 1 tablespoon salt (the salt is very important, helping the peas to soften). Soak overnight. Drain and pour boiling water over them. Cover and cook for 45 minutes or until tender.
Remove the casing of the sausage and crumble the sausage with the rosemary and one garlic clove. Heat one tablespoon of the oil in a 6-quart heavy-bottomed pot and add the sausage with the garlic clove. Sauté for a few minutes, stirring all the while. Transfer the sausage to a plate and discard the garlic.
Heat the remaining 3 tablespoons olive oil in the pot. Add the onion and the last two crushed garlic cloves and the red pepper flakes; stir for 5 minutes occasionally. When the onion turns a rich tawny color, stir in the tomatoes. Cover, reduce the heat and simmer for 10 minutes, stirring once in a while. Add the chickpeas, potatoes, and the reserved sausage; sprinkle with 2 teaspoons salt. Pour the broth in the pot and bring to a boil. Cover, reduce heat, and cook at a gentle boil for 40 minutes or until the potatoes are very tender.
Variation: If desired, mash several potato cubes in the soup to thicken.
Taste and correct seasoning before serving. Place a toast rubbed with garlic in each soup plate; pour the soup over the bread and dribble olive oil on top of the soup.
Serves 6-8

Lentil Soup
*Lentils have many healthy properties, one of which is high iron.  Kids and adults alike need more iron, if you're feeling sluggish, especially during your monthly friend, try this soup!

  • 2 tablespoons olive oil, plus extra for drizzling
  • 1 medium onion, chopped
  • 2 carrots, peeled and chopped
  • 2 celery stalks, chopped
  • 2 garlic cloves, chopped
  • Salt and freshly ground black pepper
  • 1 (14 1/2-ounce) can diced tomatoes
  • 1 pound lentils (approximately 1 1/4 cups)
  • 11 cups low-salt chicken broth
  • 4 to 6 fresh thyme sprigs
  • 2/3 cup dried elbow pasta
  • 1 cup shredded Parmesan
Directions
Heat the oil in a heavy large pot over medium heat. Add the onion, carrots, and celery. Add the garlic, salt, and pepper and saute until all the vegetables are tender, about 5 to 8 minutes. Add the tomatoes with their juices. Simmer until the juices evaporate a little and the tomatoes break down, stirring occasionally, about 8 minutes. Add the lentils and mix to coat. Add the broth and stir. Add the thyme sprigs. Bring to a boil over high heat. Cover and simmer over low heat until the lentils are almost tender, about 30 minutes. 


Shovaling Snow and Grandma's Cookies- By Joani Parrish


Nobody likes shoveling, that is nobody except my small children. We have some smaller shovels that we usually keep in our cars for emergencies, my boys love using these and helping me shovel. Doing it together turns this mundane chore into something that is extremely fun and is good exercise. If you have any elderly neighbors we love to go around and bless them by shoveling their sidewalks and driveways. It's a fun time for kids and teaches them to help others, as well as kills a couple of hours we otherwise would have spent bored in the house.

                         Sour Cream Sugar Cookies (My Grandma's favorite cookie)
If you have never made sugar cookies using sour cream, you really should give these a try. It really cuts out the sweetness by adding that sour cream, plus it makes them soft and chewy, which is just how we like them! The boys will be helping me cut out and decorate these today and maybe we will bring some of our creations to share with our neighbors!                                         
Ingredients:
  • FOR COOKIE DOUGH:
  • 5-1/2 cups flour
  • 1 teaspoon baking soda(mix 1tsp baking soda with 2-3 tsp hot water makes the cookies crunchy on the outside and moist on the inside)
  • 1/2 teaspoon salt
  • 1 cup sour cream, room temperature
  • 1 cup butter, softened (if you don't like to wait grate the butter with a cheese grater and it softens much faster)
  • 2 cups sugar
  • 2 eggs
  • 1 teaspoon vanilla
  • FOR FROSTING (makes 1 cup of frosting):
  • 2 cups powdered sugar
  • 2 tablespoons butter, softened
  • 1 teaspoon vanilla
  • 3-4 tablespoons canned evaporated milk
  • food coloring (optional)
Directions:
In large bowl, whisk together flour, baking soda, & salt; set aside. In second large bowl, with an electric mixer, cream the sour cream and butter at low speed; add sugar, eggs, and vanilla & mix until combined. (It's okay if it's a little lumpy as long as no butter chunks are visible.) Gradually add the flour mixture to the sour cream mixture, mixing until well combined. Dough will be sticky. (If cookie dough is too thick for your mixture to handle, you can stir it by hand with a wooden spoon.) Divide dough onto two pieces of plastic wrap; flatten dough, wrap tightly, and refrigerate until chilled, 1-2 hours. (Make ahead tip: Dough may be made to this point and refrigerated for up to 3 days or frozen for up to 1 month.)

ROLL, CUT, & BAKE COOKIES: 
Preheat oven to 350 degrees. Line 2 baking sheets with parchment paper; set aside.  Generously flour your counter or work surface to prevent dough from sticking. Rub flour on the rolling pin. Put one of the chilled pieces of dough on top of the floured surface and sprinkle the top of the dough with more flour. Starting at the center, roll the dough out to one edge; return to the center and roll to the opposite edge. Continue rolling until dough is an even 1/4" thick all over, sprinkling with additional flour, if needed, to avoid sticking. Dip cookie cutter in flour and cut out dough shapes. Transfer dough shapes to baking sheets. Continue rolling dough, cutting shapes, and adding to baking sheets until they are filled.  Bake 2 sheets at a time for 8-10 minutes, rotating and switching pans half way through cooking time. Bake them just until they are baked all the way through but haven't started browning on the bottom. If a soft textured cookie is desired, it's very important not to over bake them.  Transfer hot cookies to a baking rack to cool completely. (Make-ahead tip: Cooled, unfrosted cookies may be stacked in a sealed container and stored at room temperature for up to 3 days, or frozen for up to 2 weeks.)

MAKE FROSTING:
Combine powdered sugar, softened butter, vanilla, and half of the evaporated milk in a large bowl. Use an electric mixer to combine ingredients on a low speed until its' a thick paste consistency and all of the lumps are gone. Gradually add remaining milk and continue mixing on medium speed until frosting is a smooth, silky, spreadable consistency. If it's still too thick, add more milk 1/2 teaspoon at a time until it's desired consistency. Mix in food coloring, if desired.

FROST & STORE COOKIES:
Frost each cookie and decorate with sprinkles while frosting is still wet. Leave out to dry for several hours until dry to touch before storing in an airtight container. If stacking frosted cookies, put waxed or parchment paper between layers.

Recipe adapted from theyummylife.com


Snow Day Activities- By Courtney Kendall

Cold Water and food coloring. Kids can paint in the snow. Gotta love Pinterest!


Paint in a ziplock bag.  Tape it down and let kids push it around with fingers. NO MESS and super fun.  Another great Internet find :)


Tuesday, April 9, 2013

Orange Hot Chocolate- Courtney Kendall

Liv's Orange Hot Chocolate

1 Cup Milk
1 Packet Hot Chocolate Mix
3 drops of Orange Extract

Heat Milk, mix and enjoy!

Sisters in Christ

Designed By

Munchkin Land Designs
 
Designed by Munchkin Land Designs • Copyright 2012 • All Rights Reserved